Admin Item Usage and Tips for Better Online Forms
One of the most frequently misunderstood concepts is the Admin item setting on your Formsite form items. Using the Admin setting allows you to create form items that are for admin use only, but what does that mean and why would you use it?
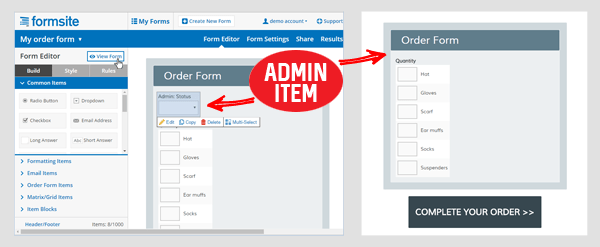
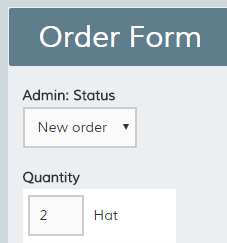
The Form Editor says that Admin items aren’t shown on your form. That means that the item will appear in your Results Table as part of the form, but the item itself will not appear on the form when the visitor completes the form.
Uses for this feature include:
- Creating an internal status or notes item for each result
- Editing or removing items from the form without losing the recorded results
- Triggering follow-up email notifications
Admin Item basic use
The most common use is to add a status or notes item to your form where you can track the individual result in your Results Table.
For example, if your order form requires multiple steps to fulfill the order, you can add a Radio Button item with the order status. When each step is complete, edit the result in the Results Table and update the form with the new status.
Virtually every item can be set to an Admin Item through its settings window in the Form Editor. The most common items are the Radio Button, Dropdown, and Checkbox items, but you can also use:
- Short and Long Answer items for admin text
- Calculation items for grading or otherwise evaluating scores
- Calendar items for scheduling
- Email Routing items for manual Notification destinations
Other uses
The other primary use for Admin Items is when modifying or removing a form item when you don’t want to lose the recorded results. Many form owners use the Results Table to track results (as opposed to exporting to Excel), and making changes to the item will change the results, too.
For example, if your question has three choices and the visitor chooses number 1, changing the order of the choices will keep the position of the choice — not the text. Imagine what happens with a few hundred results and this issue becomes a real problem.
The solution: Make a copy of the item, edit the copy, then set the original to an Admin item. This hides the item from the form but keeps its results from being modified.
Advanced tip: Trigger Notifications using Admin items
The Conditional Logic area in the Notifications settings allow you to set up specific conditions to meet before sending the email. Choosing the Results Table edit option and setting the rule to an Admin item will let you only send your email when the conditions are right.
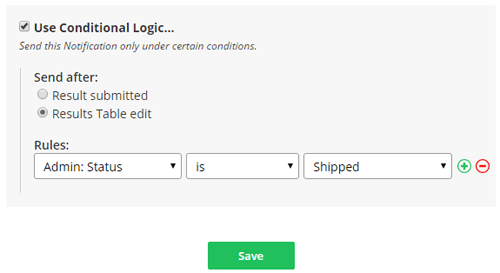
Example: Automatically send a shipping confirmation and tracking number.
- Add a Radio Button item for the status (in progress, shipped, etc.)
- Add a Short Answer item for the tracking code
- Go to Form Settings -> Notifications and create a new notification
- Enable the Use Conditional Logic and set to Send after Results Table edit
- Create a rule for when your Admin item is ‘shipped’
- Scroll up to the message area, enter your email message, and use the Insert Pipe link to get the pipe code for the tracking code