Appointment Scheduling Forms Made Easy
A popular request we get is how to make an appointment scheduling form. The requirements include letting form visitors choose from available appointment times while also preventing double-booking the same time. Our Inventory feature is the essential part of this system and this article will explain the steps for making a smart appointment scheduling form.

The most important step in creating the appointment scheduling form is determining how many days to list. For example, I can list the current month plus the next month to give enough lead time for customers without making the process too difficult. That gives me around 45 business days to maintain at any given time (61 days – 16 weekend days).
Making an Appointment Scheduling Form
In the Form Editor, start by adding Dropdown lists for the months to include, then enter the days as choices.
- Drag and drop a Dropdown list item to the form
- Enter the month name
- Repeat for all included months
Add the appointment times, Inventory, and Rules
- Drag and drop another Dropdown list item to the form
- Enter the first available day as the item name
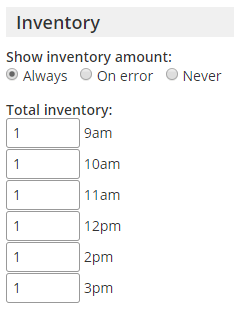
- Add the time slots for the appointments
- Click the Inventory tab and add the inventory for each time slot (typically 1)
- Set the Inventory amount to show always, on error, or never
- Click Save
- Edit the Dropdown item and click the Rules tab
- Set a rule to show when the month selected is the correct month
- Click Save
Duplicate the time item
- Mouse over the time Dropdown item and click the Copy link
- Edit the item and change the name to the next date
- Click the Rules tab and modify the Rule to show on the next date
- Save and repeat for the remaining days
Test & Optimize
- Testing the appointment scheduling form can be done by clicking the View Form button in the Form Editor and is important to make sure the Rules and Inventory settings are correct.
- Use the Form Settings -> Notifications page to set up email notifications to keep everyone informed. Use the notification message area along with Pipe codes to send the appointment details.
 The Inventory amount setting shows the number available along with the word ‘remaining’ by default, and that text can be customized on the Form Settings -> Custom Text page.
- See an analysis of the Inventory on the Results -> Analytics -> Inventory Report page.
Check out our scheduling form online template and see a live demo of this form.