Connect forms and pass information for approvals, follow-ups, multiple payment options and more.
Creating workflows that connect forms and share information is a popular request by many customers. So popular, in fact, that we created an extensive Workflow feature to automate form linking and mapping information between forms. As useful as the Workflow feature is, sometimes all you need is to connect Form A to Form B.
Some examples of where connecting forms is useful include:
- Approval: A visitor sends a form response to someone else, who then sends another response with information added to the original.
- Follow-up: A visitor sends a form response to someone who replies with a different form containing the original information plus additional questions.
- Special Payment Form: A visitor has the option to pay in full or by multiple recurring payments, which requires 2 separate forms with different payment settings.
Is it possible to connect multiple forms together and pass information between them? Yes!
Of course, the easiest way to connect forms is by using the Workflow feature, which automates much of the work below and connects the results easily in your Formsite account. Sometimes it’s possible to create the process without using Workflow, and that’s what we’re covering here.
The approval and follow-up examples use basically the same setup:
- Submit Form A
- Send email notification with link to Form B
- Submit Form B
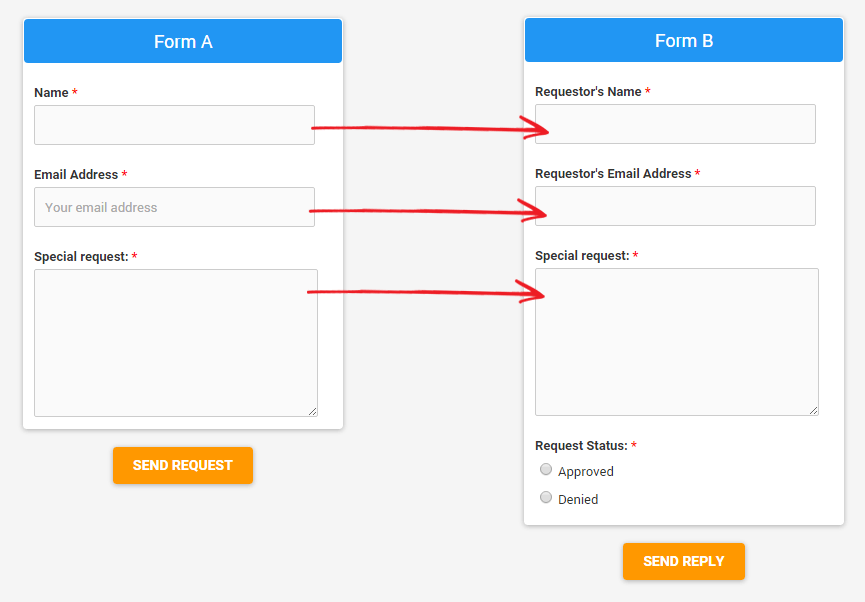
The link in the email is the crucial part of the system and uses two functions: Piping and pre-populating.
How to Connect Forms:
- Create your first form (Form A) using the form builder. Add the items you need to collect your information using the basic form fields like Short Answer, Long Answer, Radio Buttons, Dropdown Lists, Checkboxes, etc.
- Copy your form (Form B) and add any additional items, such as a Radio Button item with options for Approved/Not Approved.
- While still on Form B, go to the form’s Share page and find the Pre-populate link, then highlight and copy the link.
- Go back to Form A, go to Form Settings -> Notifications, and create your notification that will be sent to the approver. Add the email address into the To field, set any conditional logic necessary, then paste the pre-populate link into the message area along with the rest of your message.
Now we need to get the information from Form A into the link by replacing the placeholder text with the appropriate pipe codes. You can paste the link into a new browser window to see the item numbers then replace each placeholder with the item’s pipe code, for example:
https://formsite.com/url/form1/fill?4=YourValue4&5=YourValue5&6=YourValue6
https://formsite.com/url/form1/fill?4=[pipe:id10]&5=[pipe:id12]&6=[pipe:id13]
Check out our documentation pages if you need more help with using pipe codes and/or pre-populate links.
The final step is to test the system. Put your email address in the notification To field and complete Form A to receive the notification, then click the link to be sent to Form B with all of the fields complete. You can set up Form B’s notifications to send a message to the original form visitor to communicate the status (approved or not approved), or to any other email destination.
Connect forms automatically
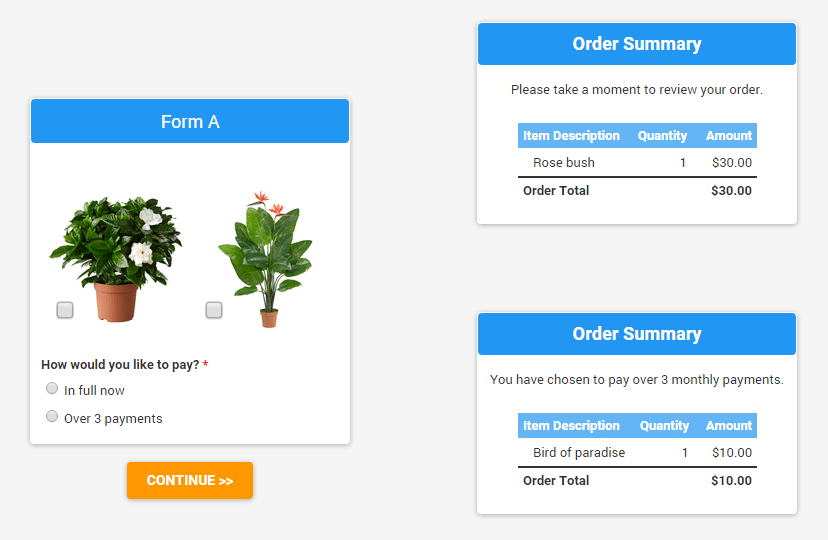
The special payment example is slightly different in that we don’t want the visitor to have to check his/her email in order to make the payment—we want it to be seamless. In that case, instead of sending the email notification we want to send the visitor to the payment form selected:
- Create Form A with the items you need, including order form items, calculation items, etc. In this example we’re adding a radio button asking if they want to pay in full or in 3 monthly payments.
- Set up the pay-in-full option on Form A using the settings under Form Settings -> Payments. This is the default setup and will use Form A’s notifications and success page.
- Create Form B for the recurring payments. Add a Hidden Field item labeled Total Cost then add a Calculation item to calculate the payment amount, being sure to check the box next to Include in Order Total.
- Go to Form B’s Form Settings -> Payments page and set up the recurring payment option. Be sure to set the frequency and the number of payments.
- Go back to Form A where we add the logic to either use Form A’s pay-in-full setup or Form B’s recurring payments. First, drag a Page Break item to the end of your form to add a page before the end of your form. This is necessary to tell the system to skip the default Order Summary screen and you can place any content you want on that last page, such as terms and conditions, information review, etc.
- Go to Form A’s Form Settings -> Success Pages and create 2 success pages: 1 for the default pay-in-full success and the other set to the Redirect URL format. For the URL, use the same method outlined above to create the pre-populate link with the form values piped in pointing to Form B.
- The last step is to go to Form A’s Rules page and create a rule after the next-to-last page to skip to the Redirect Success Page when the answer is multiple payments.
That’s it! Of course, you should test it a few times to make sure it does what you expect, and you will want to customize the success pages and notifications.
Feel free to ask questions if any parts are unclear or if you need more help.