Form Item Settings and How They Work

Building online forms with Formsite’s form builder lets form owners add many kinds of fields and items. There are text fields, multiple choice questions, file upload items, and many other specialty items. The form item settings give form owners control of how the item looks and behaves.
Whether you’re new to Formsite or an experienced form builder, some items may have settings new to you. Other settings appear for many items and are self-explanatory, like the “required” setting.
The form editor shows categories for related items, such as:
- Common Items
- Formatting Items
- Email Items
- Order Form Items
- Matrix/Grid Items
- Item Blocks
Click the category heading to expand each category to see its items and double-click an item to add it to the next available spot on the form. Dragging and dropping an item or double-clicking opens the item’s settings.
Form Item Settings
Some items may not support certain settings so they would not appear, like Default value for a Signature item. In general, the settings show:
Item type and Change type link
The Change type link lets form owners change to a similar item type without needing to delete and replace the item. The system only displays the Change type link and the choices where suitable types exist. An example of a specialty item without the Change type link is the Calculation item.
Form owners use the Change type link when needing to change to a similar item, like a Short Answer item to an Email Address item, for example. Since they both collect typed input, the type can change without losing any previously-submitted data.
Note that there are times when changing the type may cause data loss, like changing from a Checkbox Pricing item to a Checkbox item. Since the pricing doesn’t appear with the new type, changing to the non-pricing version will remove the item’s amount from each order amount.
The items’ settings window shows the sub-categories available for each item including:
- Settings
- Default Value
- Inventory
- Rules
- Calculations
Not all sub-categories show for each item at all times. For example, the Rules tab does not show until after the item is initially saved.
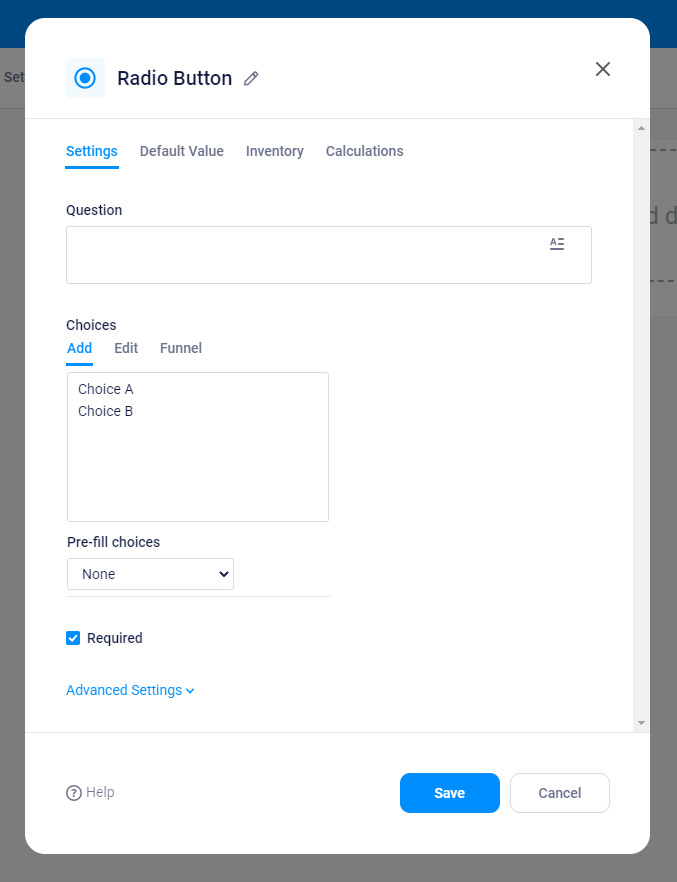
Item Settings Sub-category Tabs
Settings:
Question and text editor link. The Question box is also referred to as the Label and appears above the field or answer choices. The Question uses the form style settings from the Style -> Customize page. The text editor link shows the individual item’s style tools for styling this specific item only.
Choices (for multiple choice items). The Choices box lists each choice for Radio Button, Checkbox, and Dropdown items. Form owners can copy/paste the list of choices for fast addition. If the form has results already, the item choices must be individually edited. The Funnel tab under Choices lets form owners link the item’s choices to the answers given in a previous item. Learn more about Funneling at our support site.
Required setting. The items marked “required” must contain a satisfactory answer to proceed. Unchecking this setting means the form will allow no answer for this specific item.
Advanced settings. Clicking the link for Advanced settings shows settings for further customization. The Presentation setting, for example, allows for displaying the choices on separate rows or in multiple columns. The Question position setting places the question above or to the left or right of the input field, or hides it altogether.
Other Advanced settings:
- Read-only: Prevents changing the answer
- Unique: Prevents duplicate answers in the Results Table
- Admin: Removes the item from the live view and only displays in the Results Table
Default Value:
The Default Value tab allows form owners to set the item’s initial value. The default value can use Piping to pass an answer from a previous page or multiple pipe codes for a combination answer. Another popular option uses the Calendar item’s ‘today’ code to insert today’s date, then the Read-only setting to prevent changing.
Inventory:
The Inventory feature accepts a total number, then compares that with the number of results to establish the number available. If the answers in the form exceed the number in the Inventory setting, an error message displays and the visitor can change their answer to proceed. See the Results -> Analytics -> Inventory Report page for details on the form’s Inventories.
Rules:
The items’ Rules tabs give access to that individual item without needing to go to the Rules page. The Rules page is useful for seeing the entire form, but can be overwhelming for large forms with many rules. The Rules are identical between the Rules page and the Rules tab otherwise.
Calculations:
The Calculations tab lets form owners set scores for each choice, or add scores for specific text answers. This tab also allows for enabling or disabling Scoring for the item and more information about Scoring is on the support site.