Google Sheets Tips for Working With Online Forms
Formsite’s integrations let form owners create automated systems for processing form data. Some integrations work with uploaded files and others work with results answers, and some do both. The Google Sheets integration keeps a copy of the form results in a Google spreadsheet, which offers many possibilities.
Some of our best Google Sheets tips include:
- How to use Google Sheets with Formsite
- Functions and filters for results data
- Automated charts and graphs
- Columns to rows for multiple entries in a single result
Send Form Results to Google Sheets
Here’s how to set up the Google Sheets integration:
- Start by building the form
- Go to the form’s Form Settings -> Integrations page and click the Google Sheets icon
- Click the button to Get Authorization and complete the authentication steps
- Use the form name as the spreadsheet name or enter a custom name
- Select any Results Filters, Results Views, or Results Labels to customize the spreadsheet
- Click Save
- Test
Google Sheets Tips
Top Tip: Don’t touch the first sheet
Use the first sheet to collect results with no customizations. Reorganizing the columns, hiding columns, or adding functions only cause problems. The integration doesn’t update the entire sheet with each result so changes may not reflect as expected.
Instead, leave the first sheet as the raw data and use other sheets or separate files to perform any processing. See how to reference data from other sheets.
Add a sheet for processing
Add a sheet by clicking the ‘+’ in the bottom of the spreadsheet window, then use functions to reference the raw data. Functions begin with ‘=’ and display the result of the function. See a list of functions and their basic usage.https://support.google.com/docs/table/25273
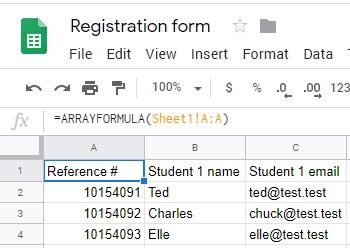
Show a copy of the first sheet
The easiest way to display an exact copy of the first sheet uses the ARRAYFORMULA function. In the new sheet, click the A1 cell and enter the function:
=ARRAYFORMULA(‘Sheet Name’!A:A)
- ‘Sheet Name’ is the name of the first sheet
- A:A means to use the entire column. Copy the code to each column by clicking the square in the bottom-right of the cell and dragging to the other columns.
Whenever the first sheet gets a new result, the data automatically appears in the new sheet.
Automated Charts & Graphs
Use Google’s built-in chart tool to create visuals for the data, which updates automatically with every result. See our previous article about automating charts and graphs.
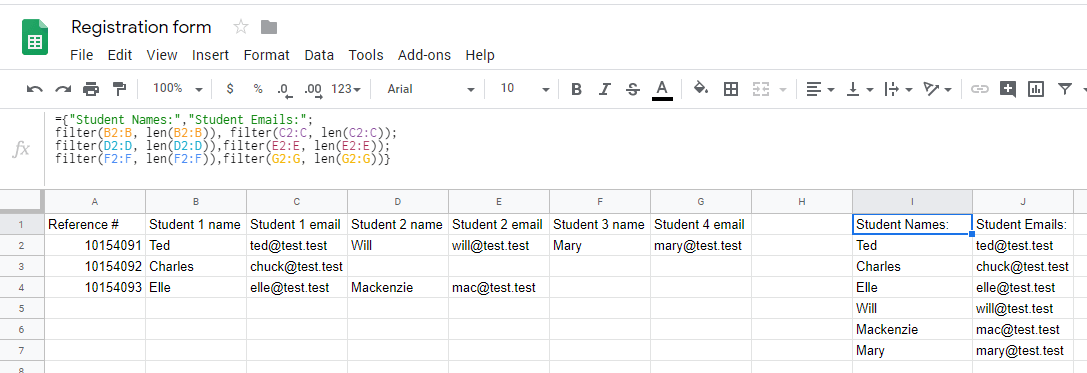
Columns to Rows
When collecting more than one entry, each result appears on one row but each entry displays in its column. The best way to convert a range of columns and rows to a single column:
={ "Student Names:"; filter(B2:B, len(B2:B)); filter(C2:C, len(C2:C)); filter(D2:D, len(D2:D)) }
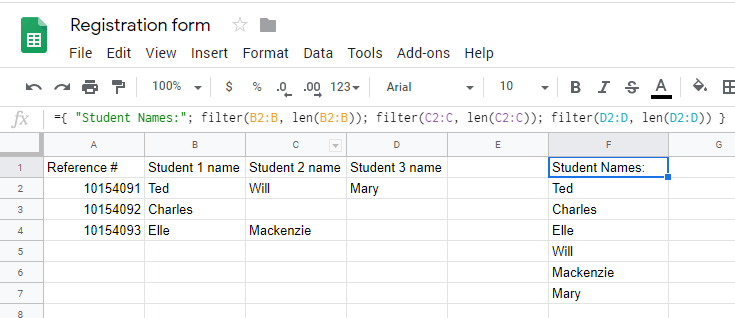
The curly brackets put multiple functions together in the same column. The ‘filter’ functions return the values in that column, starting with the 2nd row.
To display multiple columns as a group in each row, use a comma to separate the columns then add the ‘filter’ functions for each group:
={
"Student Names:","Student Emails";
filter(B2:B, len(B2:B)), filter(C2:C, len(C2:C));
filter(D2:D, len(D2:D)),filter(E2:E, len(E2:E));
filter(F2:F, len(F2:F)),filter(G2:G, len(G2:G))
}