Building a No-code Online Form Workflow
No-code communities help people develop their online projects without using code-level programming. Online services like Formsite are no-code tools that build online businesses and other processes. Using a graphical user interface (GUI), Formsite and other no-code services avoid the need for programming skills.
No-code Benefits
The communities behind no-code tools support online developers of all levels. Everyone who has ever written or edited code can attest to the frustration of a misspelled word or missing punctuation. Using a service that writes the code for you enables even experienced developers to build faster and with fewer errors.
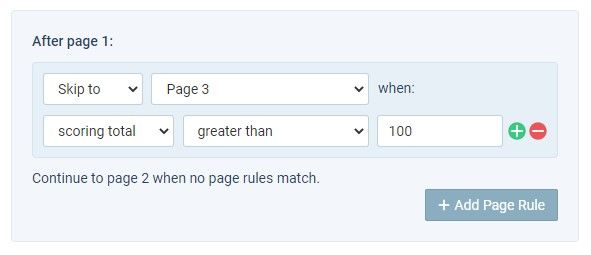
Another benefit is the ability to quickly add or remove functions without restarting the project. For example, adding conditional logic to an online form doesn’t require “if/then” conditions; only a few mouse clicks.
No-code Online Form Workflow
Here is a step-by-step guide for building a no-code online form workflow. This example shows how to collect form submissions, send emails with the answers, and pass the data to another service.
Step 1: Build the form
Formsite automates the hosting and secure link, interactive form building, and easy style settings. Start with a template or with a blank form and use the drag and drop form editor to add, edit, or remove items.
Choose from multi-select items like Radio Button, Dropdown, and Checkbox items to offer choices. Use text-based items like Number, Short Answer, and Long Answer items to collect text answers. Use the Email Address item to validate a proper email address format and use with Notification emails.
See our Getting Started video for a fast tutorial on how to build your first forms with no code.
Step 2: Set up Notification emails
Go to the Form Settings -> Notifications page to send emails after every successful submission. Choose either the Defined Address option to enter one or more addresses, or choose an Email Address item from the form. Set the destination address in the To field and optionally customize the Reply-to address.
Add a custom message or choose to include the form result, or a combination of both. Use Results Filters and Results Views to send only certain results that meet the criteria. Choose the conditions when to send each Notification by enabling the conditional logic settings.
Step 3: Integrate with other services
Creating an integration with other services lets form owners build custom no-code workflows. Connect the form to a payment processor on the Form Settings -> Payments page by enabling the chosen processor. Use a built-in integration on the Form Settings -> Integrations page and connect to 2,000+ services at Zapier.