Save & Return Tips and Shortcuts for Form Owners

Formsite’s Save & Return feature lets form visitors save their progress and submit the form later. Every form has its own link and users create logins to complete the form over multiple visits. Form owners can use these Save & Return tips as a refresher or to learn how to maximize the function’s value.
Settings Explained
The Form Settings -> Save & Return page contains these settings:
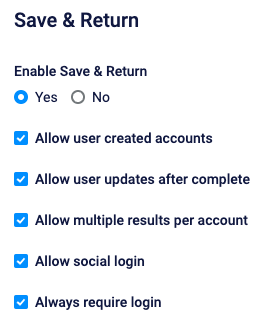
- Enable Save & Return turns the function on or off.
- Allow user created accounts lets the form owner choose whether to let visitors create accounts or not. This setting would be set to Yes for most forms. If the form owner has a list of users and wishes to create the logins instead, then they would switch this setting to No.
- Updates after complete allows visitors to edit their result only until they submit the form. If this setting is set to Yes, visitors can submit the form then continue to edit and resubmit the result.
- Multiple results per account either restricts every user to only one result, or if they should have the ability to submit multiple separate results.
- Allow social login lets visitors use a Google or Microsoft account to sign up and log in.
- Always require login lets form owners decide whether they want to require logging in or make it optional. Forms that require login will always show the login page before allowing access to the form.
Forms with optional login should contain the Save & Return item so users can choose whether to log in. If the visitor chooses to complete the form without logging in, they can provide their answers and submit the form as normal. If they start to complete the form then click the button to log in, they leave the form and lose their answers.
Save & Return Tips

- The number one tip is to use the Save & Return item correctly. If requiring logging in, use the setting to Always require login and do not add a Save & Return item to the form. If logging in is optional, add the Save & Return item only once at the top of the first page. Do not add multiple Save & Return items to the form.
- When copying the form, be sure to delete the Save & Return item from the copied form and replace it with a new one. Older forms may have links that point to their login page and the copy would need to link to its own page.
- Use the provided login or signup links to show the form you want, including with embedded forms. See the form’s Share page for the login and signup links and the Embed Code support page for the “showSaveAndReturn” parameter.
- Form owners can assign results to Save & Return users by clicking the cell in the Results Table. Click the username cell and choose the username and they can edit that result the next time they log in.